I hate stagnating things, and this blog became one for the last couple months. It has been a tumultuous time, starting a business and managing more moving parts than only myself. In the last couple months, TechLab Education has grown to seven employees and a community of nearly two hundred students. There have been ups and downs, but it has started gaining some great momentum. Along with education, we’re getting into products and DIY community building efforts in the Bay Area. Nowadays, I spend almost all of my free time doing web development for our websites, and this weekend is the end of a long journey in getting our after-school program up and running.
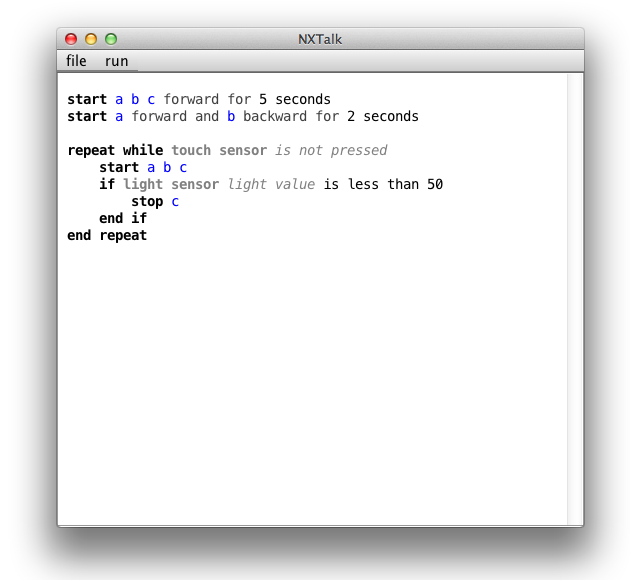
My next post will be about NXTalk, an open source programming language that I’m developing for programming the Lego Mindstorms NXT. It is built on top of leJOS, an open-source JVM for the Mindstorms brick, and is intended for students to program the NXT using a natural-language based programming language that closely resembles AppleScript. Look out for it in the next couple days – in the meanwhile, you can fork NXTalk on gitHub.
I’ll also be posting about some of the more exciting robotics projects that have been happening at TechLab. You’ll be amazed by what these kids have been making!
During the summer, I teach kids. I used to teach computer programming at the Tech Museum Summer Camps, and do some private tutoring on the side. Usually, when I tell fellow computer science students that I would rather teach kids than find a summer internship at a software company, their response is equitable to an accusation of blasphemy. We tend to forget that the quality of our education is determined by the teachers that contributed to it. Working as a summer camp instructor gave me an ideal position to contribute to the education of younger, more creative minds.
Although I cherished every moment that I got to spend at the front of a large classroom, I became frustrated by large class sizes and outdated computers. It is completely against the spirit of a teacher to leave a student behind, so my lessons would occasionally grind to a halt as I raced around the room fixing ten different problems. Sometimes, the problem would simply be that the computer was too slow to handle the software. There were some students who learned nothing from me, and there were some students who absorbed knowledge like a sponge.
After coming to terms with the inherent limitations of large classrooms and cheap equipment, I embarked on a mission to create my own education program. I started the project with a commitment to small class sizes, experienced instructors, and a unified curriculum, and looked for ways to build a viable business around it. My efforts culminated into TechLab Education, an emerging summer program and after-school program offering classes targeted at elementary, middle, and high school students. Our 21 different classes are centered on computer programming, circuit design, robotics, and web development. Everything you would want to know about the program, its classes, and its philosophy can be found on the website. I also put together this promotional video:
I chose the name “techlab” because it is a simple yet descriptive portmanteau of “technology” and “laboratory”.
Technology is the theme to our entire program – all of our classes are facets of the massive technology industry, from hardware to software. Laboratory conveys the idea of a hands-on environment, which is really what we are all about. We aren’t lecturers trying to fill a student’s head with vocabulary and theoretical knowledge – we are technology enthusiasts looking to educate students in applicable knowledge through hands-on learning.
Right now, I am finalizing a lease for a location in Saratoga, California. If all goes well, I’ll be posting pictures of our new facility as soon as everything is set up. If you’re a reader of my blog who lives nearby, consider supporting this program by
spreading the word. I’m no Ronald McDonald, which means I can’t dish out much on advertising. Forums, the blogosphere, and good ol’ word-of-mouth is the most powerful advertising medium out there – all it takes is a link to techlabeducation.com!
enrolling your son/daughter. I assume that if you’re a reader of my blog, you know by now that this is what I love to do. I have literally poured my heart and soul into everything, from the website to the curriculum for 21 different classes being offered this summer. This is an opportunity to invest in your child – teach them to build sand castles, and they will be inspired to build bridges.
applying to join the team. I am currently looking for experienced technology educators and high school students who are interested in paid internships for the summer. The website has a convenient application form.
When we think of ways in which we could use a robot to improve our lives, we usually think of humanoid robots that do our menial tasks, like folding clothes. Unfortunately, the computational resources required to build an image recognition system that could identify clothes and deduce the mechanical steps required to fold them into a certain shape are so immense that such robots will not exist for quite some time, the closest thing being the towel-folding robot made by researchers at Berkeley that takes approximately 25 minutes to fold each towel. Such is the nature of Moravec’s paradox, which is summed up quite elegantly by Steven Pinker in his book The Language Instinct:
As the new generation of intelligent devices appears, it will be the stock analysts and petrochemical engineers and parole board members who are in danger of being replaced by machines. The gardeners, receptionists, and cooks are secure in their jobs for decades to come.
Trying to apply artificial intelligence to complicated tasks like folding laundry or cooking food is difficult and pointless. A human will always be able to outperform a computer in that regard, given the current state of technological advancement. Instead of jumping on the bandwagon of investing millions of dollars into building clunky, expensive robots that will be out of the reach of the consumer for many decades (like Intel’s robotic butler HERB), my goal was to build a reasonably-priced mobile platform that can be used as a generic way to give motion to my robotics and AI projects. What I ended up with was this:
Honestly, human beings are quite adept at taking care of themselves (myself included), but sometimes its nice to have a sidekick that can drive around and interact with the world while simultaneously not eating all the food out of your fridge. Did I mention that you can program this sidekick in Python? In this blog post, I’ll describe how I made the generic mobile platform pictured above, which currently carries a mini Linux box, a Kinect sensor, and a robotic arm, and was previously used to carry around two Arduino boards and a coffee maker.
Here’s a video of the chassis in action. In the video, I’m controlling it with two Arduinos (the cheaper and preferred of the two methods, only costing ~$100 to implement). I’ll also talk about how to mount a computer and Kinect sensor, a more advance control mechanism that can run you around $450.
The essentials
For this project, I’m using an iRobot Create ($240), which is essentially a Roomba without the vacuum and the hefty price tag. With two Arduino microcontrollers ($22 each) and a pair of XBee wireless communication modules ($30 each), you can remotely control the iRobot using its open serial interface. In my current setup, I am controlling the robot with a Zotac mini running Ubuntu 10.4 ($250) and a Microsoft Kinect sensor ($150). There is also a power system (~ $60) that provides a source of mobile AC power to the electronics on board.
The iRobot is a great solution for anyone who needs a fast and robust driving base for a project or just a spunky looking RC vehicle to do your bidding. The Arduino option allows a cheap, robust, and low-power way of communicating with the robot and attaching Arduino-related peripheral devices to the robot. This is also my preferred method because it allows the Arduino to draw power from the iRobot’s onboard serial port, unlike the mini computer option which requires the heavy portable AC unit to be lugged around as well.
My motivation for this project is not to show you how to make a robot to fetch you beer. My motivation is to show you how to build a generic platform that you can implement your own ideas on, be it in the realm of robotics, human-computer interaction, or AI. Obviously, beer-fetching robotic butler falls into all of these realms, but I don’t intend to constrain the possibilities of this platform by giving it some specific purpose. Right now, I’m using it to test out skeleton/gesture detection and environment mapping using the Linux & Kinect setup, but I’m going to emphasize the Arduino route more in this blog post because it is more financially accessible to everyone (with a combined price tag of around $350).
On October 19th, I gave a talk at WTC about my work on ArduinoLink, a symbolic interface between the Arduino microcontroller and Mathematica. It’s the culmination of several months of work on the initial prototype that I created about a year ago. I gave the talk with Christopher Wolfram, 13-year-old son of [my employer and reknown scientist] Stephen Wolfram, who had previously demonstrated my work at Maker Faire 2012 in a presentation entitled “Computation Everywhere”.
In this talk, Christopher gives an introduction and a couple examples, after which I give a more in-depth look at internal structure, third party development, and control of physical devices. My segment of the talk begins at 5:25.
how to add your coffee maker to the Internet of Things
The Internet of Things is an idea that all electronic devices can be uniquely identified and communicated with over a standard medium of communication – the Internet. My foray into the Internet of Things began when I was perusing Wikipedia and stumbled upon HTCPCP, or Hyper Text Coffee Pot Control Protocol. HTCPCP is essentially a standard for communication with coffee pots over the Internet. During some free time this weekend, I built a prototype coffee maker that uses HTCPCP to allow my computer to control the coffee brewing process.
Here’s a video of the coffee maker in action.
Note that this isn’t a true Internet of Things coffee maker yet, because I’m controlling it over the USB connection and not over Ethernet. I ordered an Ethernet shield from Amazon, so once that arrives I’ll be converting it into a true coffee-making web server. Breaking apart coffee makers and adding communication protocols to them is much easier than it sounds – here’s how to do it.
CNC machines have become a recent obsession of mine, and as a result, I set about trying to build one out of a Lego Mindstorms NXT kit. After leaving my Legos sprawled across my room for around a week and a half, I finally finished creating a machine that can manipulate a cutting tool with some impressive precision. Here’s a quick demo:
A picture of the completed beast.
What is a CNC?
CNC stands for “computer numeric control”, and specifically refers to a computer manipulating the orientation of a cutting tool to produce a 3D object. Computers can manipulate a tool with a much finer degree of accuracy than a human can, so giving a computer the means to manipulate a tool allows it to create things using numeric data. All the computer needs is a machine that can move a cutting tool in the X, Y, and Z direction – the CNC machine. With 3D imaging software on a computer, and a mapping between the 3D image and motor movements on the machine, a CNC machine can cut virtually anything that is within its resolution.
In 3D printing, the resolution of a “printer” depends on the length of the smallest possible motion that the cutting tool can make along any axis. The machine has to be able to reliably move the cutting tool to any location, and vibrations from the tool’s rotation should not be able to affect the position of the tool. The cutting tool I ended up using is a cheap dremel with negligible vibration, light weight, and a low cost of $15.
The dremel is mounted to a motor that can move it up and down on the z axis. Creating uniform linear motion with Legos is a very interesting mechanical challenge, and for this CNC machine, I came up with three distinct linear actuators (mainly because I didn’t have the parts to use the same design for all three axises). For the z axis, I used a threaded-rod approach, where the spinning of a worm gear raises and lowers the carriage holding the dremel tool. It’s hard to see from the picture, since the threaded rod is inside the massive contraption, but the idea is that the motor rotating sideways is doing the same thing as a screwdriver when rotating a screw into a piece of wood.
The entire z-axis motor assembly moves on a track, pulled left and right by a chain rotating around a motor at one end of the track. This allows the cutting tool to move along the x-axis.
The chain and trolley is the second linear actuator. This linear actuator was the easiest to implement, and actually turned out to have the finest resolution when the chain was made to be as tight as possible.
The last axis (the y axis) was implemented by making a mechanism that would move the table underneath the cutting tool. The linear actuator for this last axis was made by the traditional rack-and-pinion approach to Lego linear actuation with the gear rack pieces from the Mindstorms 2.0 set.
So, what now?
Building the machine was only half the battle. Now comes [my favorite part,] the programming. Since the Lego Mindstorms software is bug-laden and wholly inadequate, I switched over to leJOS a long time ago, so I’ll be writing a G-code parser that emits NXJ source code. Check back [probably next month] for part 2!
Silicon Valley is blessed with great weather and great electronics stores. A couple months ago, I was browsing at HSC Electronics Supply, which is basically a warehouse filled with decades worth of surplus electronics. I came across a touch screen monitor and touch screen driver, which worked out to around $45 together. I was enticed by the idea of attaching a touch screen to the wall and hooking it up to Jarvis (the voice controlled assistant that controls the lights in my room).
They were relatively easy to hook up – I just slid the two ribbon cables from the touch screen into the slots on the driver. The driver takes a VGA input to display on the screen, and produces a USB output that relays touch coordinates to a computer.
After setting up the touch screen, I cut a rectangle into a wood panel for the touch screen to sit in. It may be easiest to use a router for this, but I used a scroll saw for accuracy and to avoid chipping the wood. I didn’t take too many pictures during this step, but remembered to take one while I was finishing the front.
I used aluminum strips to make the frame around the screen. This could have been done in a much cleaner and elegant way if I had some effective way to cut an aluminum sheet into a rectangular frame, but I don’t. After finishing the frame, I attached the driver to the back of the wooden panel.
It’s not the most elegant construction, but a couple screws through the touch driver into the wood panel made it pretty solid. Finally, I installed the panel on the wall in my room.
I wrote a simple applet in Java that communicates with Jarvis over ssh. The current applet is the simplest possible implementation I could think of – I just created a JLabel with an image that fills the screen, then used a MouseListener with bounding boxes to convert mouse click coordinates into specific button presses. This just goes to show you that you can program a touch screen GUI in less than an hour if your implementation is simple enough.
Although this is a very niche implementation, it is possible to mimic this setup with a computer connected to an Arduino microcontroller that uses relays to switch lights on and off. I’ve already written about using relays to control things in a previous post, so this would just involve hooking up the Arduino to a computer and programming the GUI to send serial messages to it.
I still believe the most effective light switch is a good old mechanical one, but having a touch screen on the wall adds a nice touch to the room. It’s a very affordable project, and can easily be customized to any lighting setup.
I did a video a while back about using Siri, the virtual assistant on the iPhone, to control my computer and the lights in my room. The ability to control things with a phone is a great concept, but the main problem with remote control solutions like Siri proxy is that everyone doesn’t have an iPhone 4S. Also, most people who do have the new iPhone don’t have the technical knowledge to set up a proxy server on their computer. This realization led me to write a Perl script that allows you to text commands to your computer through a Google Voice number, which is free and accessible to everyone.
A while back, I came across a PERL module called Google::Voice, that uses LWP (Library for WWW in PERL) to connect to Google Voice. The module allows you to integrate the power of Voice with PERL, my favorite scripting language. For those who have never heard of Google Voice, it is a service operated by Google that gives you a free phone number, the ability to make free calls and send free text messages, and the ability to unify all your other phone numbers under it. Google Voice can do a lot of great things, and it is, by far, one of my favorite services that Google offers.
A while back, I started developing a Perl script that integrates the Google::Voice module into a basic message parser. Over time, the message parser got increasingly advance, and has reached the point where it can control iTunes, my lights, and is easily extensible to other things as well. The script, named TextDaemon (daemon is the operating systems term for a program that runs constantly in the background), binds to a Google Voice account and pulls any text messages sent to that account. Here’s how to get it set up.
My favorite set of tools in Mathematica is the image processing functionality, for good reason. Image processing in Mathematica can be used to find Waldo or control a robotic turret. Here’s another neat example, where the imaging functions are used to generate ASCII art.
The function ASCIIimage generates an ASCII art version of a regular image that is passed into the function. ASCII images are just images created with text, where lines of text seen from afar create the illusion of an image.
The function can be applied to any image – this example imports an image from a URL and passes it into the function.
It’s hard to see from the image, but each line in that image is actually a string of characters. The image processing function works by first converting the image to grayscale, then applying a thresholding to each pixel. It then replaces each possible pixel value with a string of two characters, which are chosen based on how big they are. For example, a light gray pixel is converted to a “.:”, while a dark gray pixel is converted to a “pq”. After tweaking the mapping from pixel intensity to text, a pretty good thresholding can be found that accurately represents the spectrum.
Here’s an example image which shows what the underlying text looks like for another sample image.
If we look at these same strings of random text from afar, we can see something a bit more beautiful.
Yes, I know you can just buy a universal remote at Radioshack. It would probably look a hell of a lot better than my contraption. But can a universal remote control those awkward low-tech remotes that rely on a line-of-sight IR beam? What about all those remotes you own where all you really do is press the on/off button? A universal remote is great, but at the end of the day, its still a remote. Remotes get lost. Remotes like to hide in the last crevice you would think of checking.
An Arduino, on the other hand, is a wonderful little device that you can control from your computer. In this post, I’ll talk about hooking up an Arduino to relays, which opens up a world of possibilities. It’s a significantly cheaper alternative to a universal remote – my Arduino setup costs a grand total of $37, not including the remotes that I stripped down and attached to it. The cool part about the Arduino remote is that I can use the built-in voice recognition on OSX (reference to my previous post on Jarvis) to trigger a serial message to the Arduino whenever I say “projector on” or “screen down”. This is a great project if you’re trying to remotely control a device, be it a coffee maker, remote control, or pretty much anything that you’re willing to take apart.